Create New Scan Session – Session Setup (app)
Scan sessions are used when scanning individual animals for Arriving, Handling and Exit.
Creating a Session
A Session can be created on the web or the app. For instructions on creating a Session on the web, refer to Create New Session – Scan Session (web).
- On the Dashboard, tap Sessions.
- Tap + Scan Session.
- Select Property, input a Name for the session, select Type and Sub-Type from the drop-down lists.
Select a Template if the template has been setup on the web. For detailed instructions on setting up a template on the web, refer to Session Templates (web). Where a template is selected, the session sub-type will be set by the template, but can be changed in the next screen once the session is created.Tap Create Session.
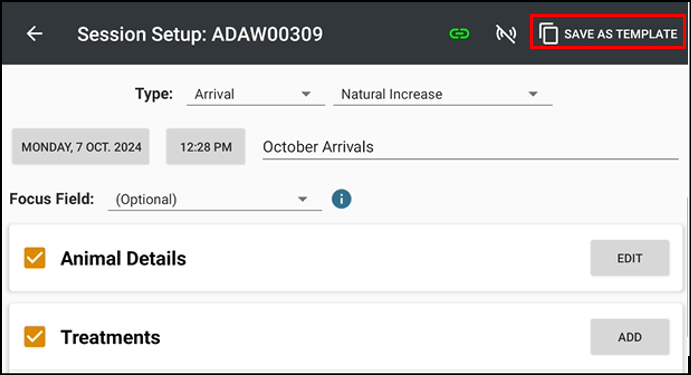
Setting up a Session
- The Session Setup allows users to pre-define which fields will be included, defaulted, made mandatory, and incremented, in the scan session about to be conducted.Only included sections can be edited.
- Select a Focus Field from the drop-down list. This is optional.It allows the user to specify a field to automatically focus on when opening a new scan on the app.Ensure the Focus Field is Visible as part of the Session Setup to ensure availability for data entry.
During a Scan Session, the Focus Field specified may be populated with data from a Barcode Scanner, if connected.
There are eight sections on the Session Setup screen. Each section is explained in detail below.
Animal Details
- The Animal Details section is usually included in a Session as it includes identifying information about the animals in the Session (otherwise, only EID and Visual Tag will be visible). Tick Animal Details, tap Edit.
- Tap
to expand each category.
- Tick or untick individual fields by tapping them to make them visible in the Session. Select Set Default, Mandatory, and Preset List as required.Only Visible fields will be available to edit in the Scanning Session. Defaults for Not visible fields will still be applied to the animals.
- Defaults: Where a Default is selected, for each animal in the session, that field will initially be populated with the default to save time, but it can be modified.
E.g. If ‘Angus’ is the default Breed, Angus will be the selected Breed each time an animal is added to the session. The animal’s Breed can be manually changed to another Breed within the session. - Preset Lists: Where a Preset List is selected, for each animal in the session, only those values will be available as buttons for selection against the pertinent field, for simplification.If no preset list is defined, all values will be available against the pertinent field.E.g. If ‘Angus’ and ‘Angus X’ are Breed Preset Lists, these two Breeds will be the only two Breed options, displayed as buttons, within the session (regardless of whether a Default is selected). Other options can be selected via the drop-down, if required.
- Mandatory: Where a field is marked as Mandatory, data entry for that field will be enforced as part of the scan. If a field is set as mandatory, when scanned into an app session, the history for the field will be visible - but the value will be blank. The scan will be validated on Save to ensure all Mandatory fields have been populated as part of the scan.Fields must be Visible to also be made Mandatory.
For the fields in the Pregnancy card, only animals with the sex of Female will have the Mandatory fields enforced.
The fields in each section of the Animal Details screen are listed below:
The sub-categories marked with an asterisk (*) indicate that these fields can be made mandatory. When the Scan is saved, it will be automatically validated to ensure all Mandatory fields have been populated as part of the scan.
| CATEGORY | SUB-CATEGORY |
Weight and On Feed | Weight* Expected ADG Interim ADG Overall ADG ADG Adjustment On Feed |
Mob and Ownership | Mob* Group* Lot* Owner* |
Attributes | Gender* Breed* Dentition* Class* BCS* Breed Content* DOB* Year Brand* Colour* Horn Status* |
Classifications | WHP, ESI. HGP, EU and LT are always visible HGP |
Pregnancy | Pregnancy* Joining* Lactating* Ovum Pick Up* Note: Defaults will not be applied to male animals. Note: Mandatory fields will only be enforced for female animals. |
Parentage | Parentage |
Herd Prefix Herd Ident Conception Type Conception Date Year Letter Calf Tattoo Name Twin Calf Fate Management Group Calving Ease Registration Type ET Reference ET Implant Date ET Recipient Ident ET Recipient Breed Code ET Recipient Year of Birth Calf Breed Code | |
Other Breeding Traits (Breeding Module required. Refer to Breeding Overview (web & app) for details). | Flight Time Sheath Score Rib Fat Fat Depth Intramuscular Fat Eye Muscle Area Temperament Animal Structure Muscle Score Feet Score Front Legs Front View Front Legs Side View Front Feet Claw Set Front Feet Angle Back Legs Rear View Back Legs Side View Back Feet Claw Set Back Feet Angle Hair Coat Hip Height Breed Society Ovary Score Reproductive Tract Score Scrotal Circumference Left Testis Tone Right Testis Tone Semen Density Semen Mass Activity Semen Sample ID Motility Morphology |
Genetic Recessive Conditions | AM B3 CA CHS CL16 DD DW F11 HH IARS MA NH OH OS PD |
Arrival/Induction | Auto-increment Visual Tag Origin Property Origin PIC Vendor SAN |
Only Administrators and Area Managers are able to set Mandatory fields in the Animal Details section in the Session setup.
Operators will be unable to change the Mandatory fields in the Animal Details section of Session setup for individual sessions.
Other cards in the session template setup will still be editable by Operators (Treatments, Follow-ups etc) They will also have access to all the fields on the scan screen to allow data entry for outliers.
Treatments (optional)
- If Treatments are to be included, tick Treatments, tap Add.
- Enter Treatment Item Details, then tap the Back Arrow (top-left) to save. Repeat for each Treatment Item.If Auto Apply is ticked, the Item will be applied to all animals in the session by default (but can be deselected for specific animals within the session).
If Auto Apply is unticked, the Item will appear in the Scan Session, but will only be applied to animals if Apply is manually selected within the session.
Refer to Setup Treatment Items (web & app) for detailed instructions on adding Treatments to the drop-down list. Refer to Setup Health Reasons (web & app) for instructions on setting up a list of Ailments.
DNA (optional) Breeding Module required.
Tick DNA to include the DNA section in the Scanning screen. Select Laboratory and Type from the drop-down list.
The Laboratory and Type selected, will be set as defaults and will apply to all animals scanned into the session.
The Laboratory and Type selected, will be set as defaults and will apply to all animals scanned into the session.
Case Number is a required field for DNA Documents. Therefore, DNA defaults can not be used in conjunction with Unattended sessions, as this would result in blank Case Numbers.
Follow-ups (optional)
- Tick Follow-ups. To add a Follow-up reason, which will be applied to animals within the session, tap Add.
- Select a Follow-up reason from the drop-down list. Select Auto Apply to apply the follow-up reason to every animal in the Scan Session.If Auto Apply is ticked, the Follow-up will be applied to all animals in the session by default (but can be deselected for specific animals within the session).
If Auto Apply is unticked, the Follow-up will appear in the Scan Session, but will only be applied to animals if Apply is manually selected within the session. The Follow-up reason cannot be empty if Follow-ups have been included in the Session.Refer to Follow-ups (app) for detailed instructions on adding Follow-up Reasons to the drop down list.
 - Tap the Back Arrow (top-left) to save. Repeat for each follow-up.
Services
- Tick Services. To add a Service, tap Add.
- Select a Service Type and Contact from the drop-down lists. Include a Comment, if required.Select Apply to apply the Service to all animals in the Session. Tap Continue.If Apply is ticked, the Service will be applied to all animals in the session by default (but can be deselected for specific animals within the session).
If Apply is unticked, the Service will appear in the Scan Session, but will only be applied to animals if Apply is manually selected within the session.
Gates/Movements
- Tick Gates/Movements, tap Add to include Gates in the Session. Or select Yards.Gates are required for moving animals within a Session.When Gates/Movements is ticked, Draft Rules will become visible.
- Input details for the Gate.
- Tap the Back Arrow (top-left) to save. Repeat for each Gate.
Draft Rules
- Tick Draft Rules, tap Add.
Draft Rules will calculate the destination of animals in the Session based on various set parameters such as: Target Weight, Days on Feed, Property/Paddock, Mob, Group, Lot, Gender, Breed, Class, Dentition, Body Condition Score, Breed Content, Owner, Year Brand, SAN, Has Active Follow-up, Is Flagged, Pregnancy, Lactating, Within WHP, Within ESI, HGP Treated, EU and LT. Gates must be included in Gates/Movements before Draft Rules can be created.
 - Input a Draft Rule, select Gate. Tap the Back Arrow (top-left) to save. Repeat for each Draft Rule.
Notes about creating Draft Rules: - One Draft Rule can consist of as many 'IF' parameters as required.
- E.g., "IF Target Weight = >350kg, and Gender = Cow, and Pregnancy = Empty, and Lactating = Dry, THEN Draft To Gate 1".
- Setup as many Rules as you require for the Session. E.g. subsequent Rules to the above could be:
- "IF Target Weight = >250kg, and Gender = Cow, and Pregnancy = Empty, THEN Draft To Gate 2".
- "IF Pregnancy = IN CALF, and Lactating = WET, THEN Draft To Gate 3".
- The order Draft Rules are setup in is important. Draft Rules are always assessed from the top of the list. If an animal does not match the top rule, the second rule is then assessed - and so on. A visual indicator of a Draft Rule that will not be assessed is displayed in the Session Setup.Moving the problematic Draft Rule further up the list of rules will usually resolve the issue.Tapping on the warning icon will provide additional information.If the sort rule order is not corrected, when moving to the Scan Summary an additional popup will be visible. This message will also be displayed when a Session is created using a Template with incorrect Draft Rules.The Session will be able to be conducted while there are Draft Rules with warnings - however, it would be likely the Draft Rules will not perform as intended.
There must be an ‘ELSE’ Rule set up.
Unattended
- Tick Unattended, when required. Toggle the options as suitable.The Unattended option allows animals to be processed automatically when scanned - without needing to tap Save and Close. Ideal for when no manual data entry is required.
Hardware Connected
- Tap Hardware Connections (top-right, comms icon).
- Toggle required devices for the session. Icons will turn green when there is a successful connection.
Refer to the Hardware Connections Overview (app) and related Help Documents for Device specific settings and information.
Saving the Template
Once the Session has been setup, the Template can be saved for future use. Tap Save as Template.
Accessing Session Templates
To access existing Session Templates, tap Session Templates.
Tap the relevant Session Template to see the Options menu. Tap Session Setup to view the pre-defined fields that have been set for a scan session.
Related Articles
Create New Scan Session – Scanning (app)
From the Session Setup screen, tap Start Scanning. For further details about setting up a Scanning Session refer Create New Scan Session – Session Setup (app). Overall Session Screen Tap the Cog Icon to return to the Session Setup screen. Tap Note to ...Joining Plan Scan Screen, Session Defaults, Reporting (web & app)
Before creating a Session to record Joining, ensure that a Joining Plan has been recorded in StockMate. Refer to Joining Plan View and Report (web) for detailed instructions on setting up a Joining Plan in StockMate. A Joining Plan can only be setup ...Edit Existing Session (app)
Imported, Scanned or Bulk Sessions that have been entered via the web or the app can be edited. From the Dashboard, tap Sessions to view the Session List. A list of Sessions is displayed. Reconciled Sessions are shaded green The selected Session is ...Session Screen Overview (web)
The Session Screen displays all the animals that were scanned, imported or bulk uploaded into StockMate in a selected Session. Other Session related information can been viewed, added or edited from this screen. Accessing the Session Screen Select ...Session Templates (web)
Session Templates can be setup on the web. These will then be available for use on the Tablet in a Scan Session. When setting up a Session Template, there are seven sections on the Session Template Setup screen: Animal Details, Treatments, DNA ...